Friday, August 28, 2020

How to Create an array with user input in PowerShell


$arr =@() #Create a variable for array
Write-Host "how many numbers you  want in An Array" 
[int]$LenOfArray = Read-Host  #User Input
for ($i=0;$i -lt $LenOfArray$i++)
{
  $num = Read-Host "Enter $i Index number";
 $arr +=$num
}
Write-Host "The Array is $arr"

Friday, June 5, 2020

Want to hide output in PowerShell ?

Out-Null 

When we execute any command in cmdlet, usually it send its result down the pipe line .
In other words, we can say if we execute any command it display it's output.
Let's see below, here it is listing all the child item inside the windows directory.

 
Now we will use out-null, let's go : Here it does not return any output.

Thursday, May 21, 2020

Using FilterHashTable In powerShell

A hashtable is Similer an array,But it use "key = value” type of syntax.
Let's See how to use FilterHashTable for a filter.

Here is I am trying to get the System event with the specific event ID 1017.
I passed a parameter "Maxevents", will list the only one event .


Get-WinEvent -FilterHashtable @{LogName = 'System'; ID = 1014} -MaxEvents 1|ft -Wrap


Sunday, May 10, 2020

Splatting in PowerShell


Splatting is a method of passing a group  of parameter to a command as unit.
PowerShell associates each value in the collection with a command parameter.
Splatted parameter values are stored in named splatting variables, which look like standard variables, but begin with an At symbol (@) instead of a dollar sign ($).

 The At symbol tells PowerShell that you are passing a collection of values, instead of a single value.
 It Improves the  readability Code.

Here is the way :

$parm = @{
    name = "testuser"
    AccountExpires = "11-05-2020"
    Description ="This is test user,will be deleted soon"
    password = Read-Host "Enter the passoword" -AsSecureString

}
New-LocalUser @parm


Friday, May 8, 2020

PowerShell Passthru Parameter


There are many Windows PowerShell cmdelts that simply work, and they do not return any data.
Here with the Passthru parameter, PowerShell returns the output in the console.

Here I simply use "Start-Process notepad", It started notepad process but did not return the Output
to the console.

PS D:\VS Codes\C\myproject1> Start-Process notepad       
PS D:\VS Codes\C\myproject1>


Now I will use "PassThru" Parameter, Let's See .

PS D:\VS Codes\C\myproject1> Start-Process notepad -PassThru

Handles  NPM(K)    PM(K)      WS(K)     CPU(s)     Id  SI ProcessName
-------  ------    -----      -----     ------     --  -- -----------
      1       2      520        196       0.16  23436   1 notepad

Here It started the the Process Notepad, and gave me the output of the execution of command .

Note: You want to know how many Windows PowerShell cmdlets have "passthru" patameter

Get-Command -CommandType 8 | where {$_.definition -match ‘passthru’}

Wednesday, May 6, 2020

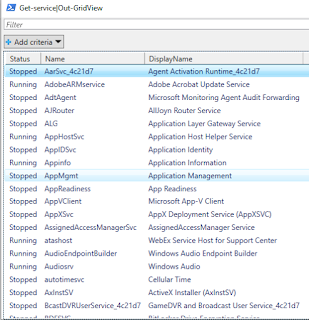
Out-GridView In PowerShell


The Out-GridView cmdlet sends the output from a command to a grid view window where the output is displayed in an interactive table, which help us to copy the output in tabular format.

Try This:
Get-service|Out-GridView


Tuesday, May 5, 2020

How to Configure Azure Active Directory Domain Service


This article shows how to enable Azure Active Directory Domain Services (Azure AD DS) using the Azure portal.

To launch the Enable Azure AD Domain Services wizard, complete the following steps:

1. Go to the https://portal.azure.com

2. In the left pane, click on New.
3. In the New blade, type Azure AD Domain Services into the search bar.


4. Click to select Azure AD Domain Services from the list of search suggestions. On the Azure AD Domain Services blade, click the Create button. 


5. The Enable Azure AD Domain Services wizard is launched.
6. Now configure basic settings as below:

(a) Choose the DNS domain name for your managed domain.
(b) Select the Azure Subscription in which you would like to create the managed domain.
(c) Select the Resource group to which the managed domain should belong. You can choose either the Create new or Use existing options to select the resource group.
(d) Choose the Azure Location in which the managed domain should be created.
(e) When you are done, click OK to move on to the Network page of the wizard.


7. Next Step to configure network settings.

(a) Click Virtual network to select a virtual network.
(b) Choose the virtual network (if already created) or create the new one.
(c) Select or create the dedicated subnet for Azure AD Domain service
(d) When you are done, click OK to move on to the Administrator group page of the wizard.


8. Next Step to configure administrative group

(a) The wizard automatically creates the administrative group in your Azure AD directory. This group is called 'AAD DC Administrators'. If you have an existing group with this name in your Azure AD directory, the wizard selects this group. You can configure group membership using the Administrator group wizard page.
(b) Click the Add members button to add users from your Azure AD directory to the administrator group.
(c) When you are done, click OK to move on to the Summary page of the wizard.


(d) On the Summary page of the wizard, review the configuration settings for the managed domain. You can go back to any step of the wizard to make changes, if necessary. When you are done, click OK to create the new managed domain.


(e) You see a notification that shows the progress of your Azure AD Domain Services deployment. Click the notification to see detailed progress for the deployment.

9. Provision your managed domain
The process of provisioning your managed domain can take up to an hour.

(a) While your deployment is in progress, you can search for 'domain services' in the Search resources search box. Select Azure AD Domain Services from the search result. The Azure AD Domain Services blade lists the managed domain that is being provisioned.
(b) Click the name of the managed domain (for example, 'test.com') to see more details about the domain.
(c) The Overview tab shows that the domain is currently being provisioned. You cannot configure the managed domain until it is fully provisioned. It may take up to an hour for your managed domain to be fully provisioned.
When the managed domain is fully provisioned, the Overview tab shows the domain status as Running
(d) On the Properties tab, you see two IP addresses at which domain controllers are available for the virtual network.

10. Update DNS settings for the Azure virtual network

To update the DNS server setting for the virtual network in which you have enabled Azure Active Directory Domain Services, complete the following steps:

(a) When your domain is fully provisioned, two IP addresses are displayed in this tile. Each of these IP addresses represents a domain controller for your managed domain.
(b) To copy the first IP address to clipboard, click the copy button next to it. Then click the Configure DNS servers button.
(c) Paste the first IP address into the Add DNS server textbox in the DNS servers blade. Scroll horizontally to the left to copy the second IP address and paste it into the Add DNS server textbox.
(d) Click Save when you are done to update the DNS servers for the virtual network.

11. Enable password synchronization to your managed domain for cloud-only user accounts.

(a) To authenticate users on the managed domain, Azure Active Directory Domain Services needs credential hashes in a format that's suitable for NTLM and Kerberos authentication.
(b) Go to the Azure AD Access Panel page for your organization.
(c) In the top right corner, click on your name and select Profile from the menu.
(d) On the Profile page, click on Change password.
(e) A few minutes after you have changed your password, the new password is usable in Azure Active Directory Domain Services. After a few more minutes (typically, about 20 minutes), you can sign in to computers that are joined to the managed domain by using the newly changed password.


Featured post

System-preferred multifactor authentication (MFA)

Popular Posts